Glenn Smith and Darren Wilmshurst with Radtac, a Scaled Agile Partner, co-wrote this blog post.
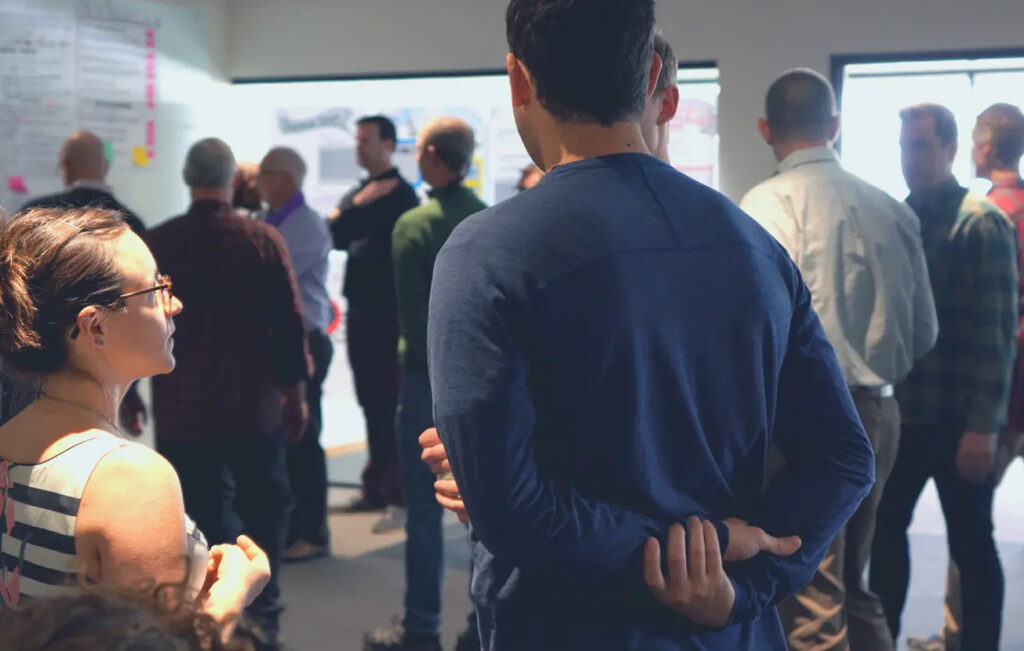
At the conclusion of Program Increment (PI) Planning, we’re always reminded of something one of our colleagues always says. There’s much to celebrate because we’ve created a set of committed plans. But we first have to complete a retrospective of the PI Planning event (cue groans from everyone in the room) and we “start preparing tomorrow” for the next PI (more groans).
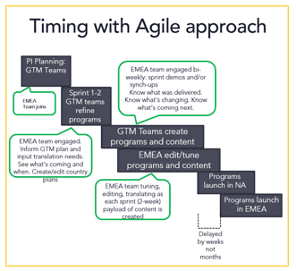
Moreover, the critical path for any PI Planning is the creation of the content, suitably refined and prioritized. Without this, we can’t do any planning! But what does this look like in practice?
This blog post is aimed at coaches who need to think about the content preparation for the next PI. By that we mean SAFe® Program Consultants (SPCs) supporting the Agile Release Train (ART) and Release Train Engineers (RTEs). But more importantly, Product Management (PM) and System Architects (SA) need to create, refine, prioritize, and socialize the content supported by Product Owners (POs) and Business Owners (BOs). We will explore each of these roles in turn during the course of this post.
The traditional siloed hierarchy of organizations can engender a ‘this isn’t my job’ attitude. Yet many people and roles need to work together to create a compelling backlog that delivers economic benefits and satisfies your customers.
The visual model below is a high-level view of the intensity of the preparation activity for each of these roles. It isn’t meant to represent the number of hours. That is, high intensity does not mean 100 percent of your time, we just expect more time spent on preparation while recognizing that there will be other things to be done.
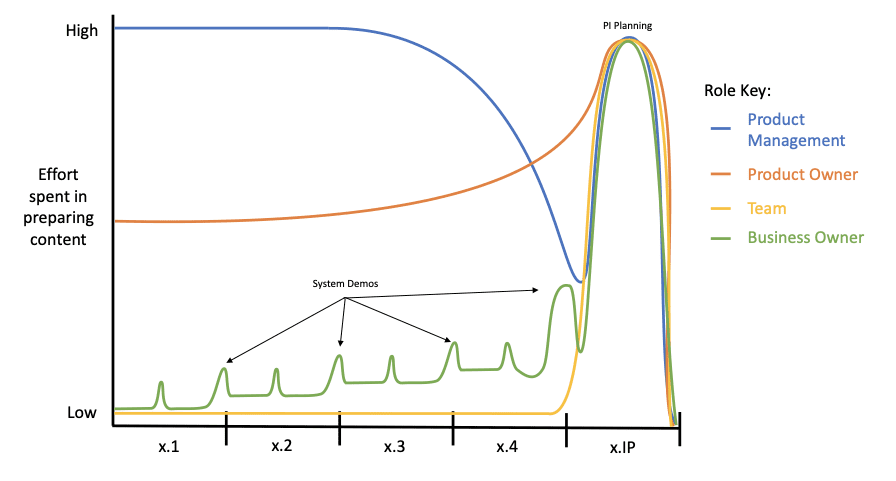
You will also notice that there is a significant spike in preparation during the Innovation and Planning (IP) Sprint for PM, BOs, POs, and the Teams. This is when PI Planning happens.
Product Management and System Architect
PM and the SA will follow a similar pattern to each other, as their roles are two sides of the same coin—one focused on the outward market and the other technically oriented. They are going to be collaborating and working closely to make sure their respected needs are met and the right balance of the work is correctly scheduled.
Crafting backlog items for an ART, whether they are Business Features or Enabler Features, follow a pattern of Creating, Refining, Prioritising, and Socialising. While overly simplistic, each step could follow the first four iterations of a PI. In the first half of the PI, expect PM and the SA to be looking to the future. This will include looking at upcoming Epics, decomposing existing Epics, and the ART roadmap and associated Architecture Runway.
A common pattern is to see poorly defined Features with weak benefit hypothesis statements and acceptance criteria. It shouldn’t be overlooked how much effort this takes to do well. This is because the work involved isn’t just writing them down in your Agile Lifecycle Management tooling, but working with BOs, talking to a wider stakeholder cohort, including customers, and reviewing market trends. Improving their own understanding of the value proposition and scope enables people on the ART to more easily deliver against it. Through the PI, their effort tapers as other cohorts take the backlog content and prepare for PI Planning.
Business Owners
BOs are key stakeholders and critical friends of the ART. As such, they gradually experience an increasing demand on their time to support creating backlog content throughout the PI—with the most involvement happening during PI Planning. As a cohort, BOs are available when needed by the likes of PM, and actively participate in the System Demos every iteration. Here, they not only get to see the progress of delivery but give feedback to help PM and the POs inspect and adapt the backlog.
We recommend that prioritization be a ‘little and often’ affair. And as it is a team sport, BOs must attend these sessions (these are the little spikes on the BO line in the model).
Product Owners
In a scaled environment, POs serve both the team and the train. In the initial periods of the PI, as you might expect, the PO has both a team execution focus and needs to support PM with Feature creation and refinement. As the content starts to get in better shape for the upcoming PI Planning, PO involvement increases, but with a shift in focus to Feature elaboration and decomposition into drafting user stories to later socialize with the team.
The Team
Through most of the PI, the team is execution-focused, although on hand for those ad hoc, short whiteboard sessions with PM, SAs, and POs. Larger demands on the team’s time should be scheduled like any other demand on their time—after all, work is work! This will be done through the use of exploration enablers in a future PI, or spikes and innovation activities that occur during the IP iteration. Either way, the outcome is gaining knowledge that reduces the uncertainty of future work.
The team’s involvement, however, peaks during the IP iteration when the POs socialize the upcoming backlog of work—the Features and the draft stories they have created. It is during the preparation for PI Planning that the team takes time to understand what is needed and answer questions that need “I’ll look in the code” to find out.
Release Train Engineer and Scrum Master
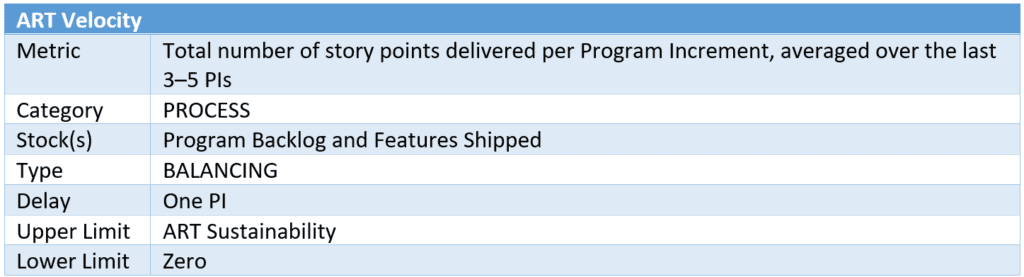
Hey wait, you didn’t forget about the RTE and Scrum Master (SM), did you? Surely they are just facilitators, we hear you say, what do they have to do with backlog items? But let’s think about this. As facilitators at the train or team level, they are key advocates for the improvement of flow and value delivery. Therefore, it is not unreasonable to expect them to create improvement items that require effort from the teams during the PI. And we know that anything that requires effort from the teams should be planned accordingly.
The items that the RTE and SM will bring to the table for inclusion will likely come from team retrospectives, the Inspect and Adapt problem-solving workshop, or from insight gained from activities like the SAFe® DevOps course.
Creating Content During PI Planning
During each PI Planning session, PM presents the vision, which highlights the proposed features of the solution, along with any relevant upcoming Milestones. While some may feel that at this point in the proceedings the content creation is over for PM, there is actually still work to do. During the planning, there will likely be scope negotiations and prioritization calls needed as the teams get deeper into understanding and scheduling in their breakout sessions.
Similarly, the BOs have a role in adaptive content creation too. Beyond providing the business context in the briefings, they will work with the team to discuss the needed outcomes from the work. And they’ll support PM and the SAs in adapting the scope from what was originally crafted—because tradeoffs need to be made during planning. Discussions with the teams during the assignment of Business Value could influence what gets produced in the upcoming PI too.
While the POs and the Teams need to sequence and plan their stories to maximize economic results, there will almost certainly be variability of scope that will need to be accommodated as new information emerges. This will involve further elaboration, negotiation, planning, and reworking of the content during PI Planning.
In addition, the model shouldn’t be followed religiously, but used to identify who, when, and by how much focus the different roles on the train need to spend to make this happen. While putting an emphasis on the quality of the backlog items is going to help your ART, it alone won’t fix your delivery problems but will act as a key enabler in doing so.
It is important to give a government health warning at this stage: context is king! While we have given our view on the preparation activities and the intensity, your context will provide a different reflection. In fact, when creating this post, we both had a slightly different approach for prioritization based on our respective experiences. Neither is right or wrong but a reflection on the clients that we have worked with. So please treat the model we have created as a ‘mental model’ and something you can use with your trains to frame a discussion.
The pattern, while broadly accurate, will change in some situations, particularly if you are preparing for a training launch and this is your first PI. Here, the cadence may be condensed and more focused, but this will be guided by the quality of the backlog content you already have.
A final thought and back to our colleague who says that “PI Planning starts tomorrow.” So does PI Execution. There’s no point in making a team committed to the plans that you have created and then not executing on them. Otherwise, what was the point of PI Planning in the first place?
If we’ve piqued your interest, check out this post about changing a feature in the middle of the PI. It’s a question we always get asked when we teach the Implementing SAFe® class.
About Glenn

Glenn Smith is SAFe Program Consultant Trainer (SPCT), SPC, and RTE working for Radtac as a consultant and trainer out of the UK. He is a techie at heart, now with a people and process focus supporting organizations globally to improve how they operate in a Lean-Agile way. You will find him regularly talking at conferences and writing about his experiences to share his knowledge.
Share:
Back to: All Blog Posts
Next: We’re Giving More Than a Donation for Pride Month